err_name_not_resolved SOLVED
Before we get right to the solution let’s do a bit of a background study. Every time you open up your browser and type in the address of a website, your browser goes and contacts the DNS server of the specific website. DNS stands for Domain Name Server. Now we can call DNS servers the internet’s equivalent of a phone book. What it essentially does is store domain names and when requested to, convert these domain names to their unique IP addresses. Our browser is then redirected to the IP address of the website we want to visit. Sometimes though this particular operation fails. And this is when Chrome gives us the infamous “Error 105 (net::ERR_NAME_NOT_RESOLVED): The server could not be found” error. So now you know what exactly is causing the problem, let’s get right to the solution so you can get back to surfing the internet.
Ways to solve err_name_not_resolved
1. Restart your router
Sometimes the easiest way to solve a tech related problem is by restarting the device. Literally. Go ahead and switch off your router and switch it back on again in a minute. This should get rid of the problem. If it still persists try the following steps.
2. Delete Cookies
If restarting your router doesn’t do the trick you can try to delete the cookies on your browser.
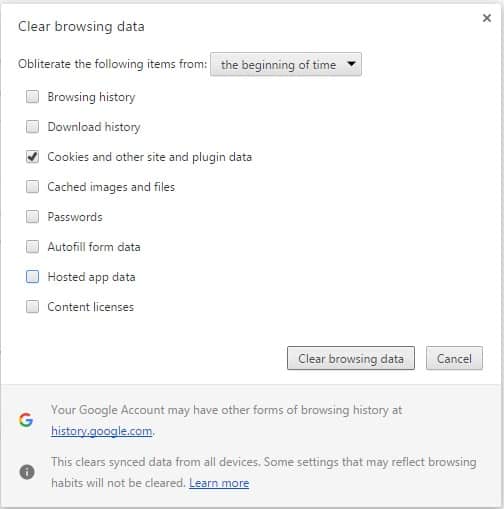
You can do this by opening Chrome and doing the following :
- Press Ctrl+H
- Click on “Clear Browsing Data”
- Check mark “Cookies and other site and plugin data”

- Click on “Clear Browsing Data”
- Restart Chrome and try connecting to the Internet.
In case the above two methods fail to work you can go ahead and follow the methods listed below to solve your issue.
3. Try flushing your DNS
Every time you visit a website its Domain and IP are stored in your computer as cache. What flushing your DNS does is literally flush all the saved Domain names and IP address and therefore the next time your visit the website your computer will have re-fetch new combinations instead of using the old ones. This sometimes helps in solving the error.
Here’s how you can flush your DNS.
Windows
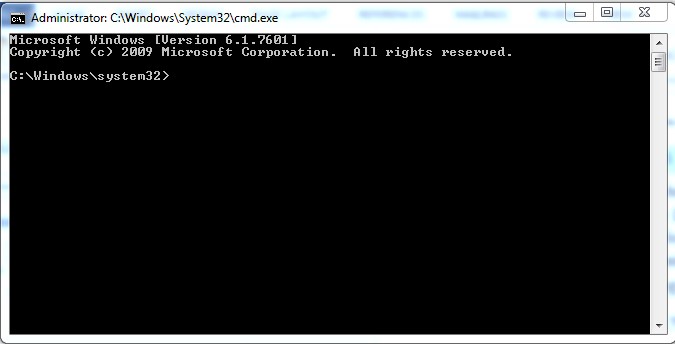
Step 1: Open up Command Prompt with administrative permission.
For those of you who don’t know how to do that.
- Click on Start.
- Search for “cmd”
- Right Click on the program that comes up and then click on “Run as Administrator”

This is what should come up on the screen.
Step 2: Type in “ipconfig /flushdns”. Hit enter.
Step 3: Next type in “ipconfig /renew”. Hit enter again.
Step 4: Finally key in “ipconfig /registerdns” and press enter.
That should flush the DNS cache. Try going online and check if this works.
Mac
Flushing the DNS on Mac OS X is a fairly simple process. But it varies from version to version. Follow the steps mentioned for your OS to flush the DNS.
FOR OS X EL Capital, Mavericks, Mountain Lion and Lion
- Open the command terminal
- Type the command sudo killall -HUP mDNSResponder
For OS X Yosemite
- Open the command terminal
- Type the command sudo discoveryutil udnsflushcaches
For OS X Snow leopard
- Open the command terminal
- Type the command sudo dscacheutil –flushcache
For OS X leopard and below
- Open the command terminal
- Type the command sudo lookupd –flushcache
You should be able to access the Internet now. But just in case you are unable to, follow the last step to make things work again.
4. Changing your DNS Servers
If you can’t access the internet even after flushing your DNS servers you can pretty much guarantee that something is wrong with your DNS server. What you can do if you encounter this problem is to start using a new DNS server entirely. Of course, Google’s own DNS server is highly recommended but you can always try out other DNS servers if you’re feeling lucky!
Here’s how you can go about changing your DNS server
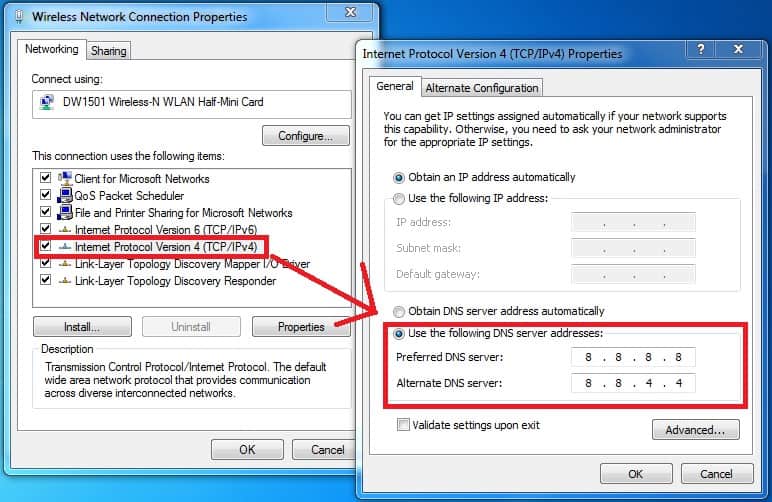
- Open Control Panel and open up Network and Sharing Centre
- Select the Internet connection you are using.
- Click on properties.
- Double click on Internet Protocol Version 4 (TCP/IPv4)
- Click on “Use the following DNS server addresses”

- Key in 8.8.8.8 as the “Preferred DNS Server” and 8.8.4.4 as the “Alternate DNS Server”
- Click on the box that says “Validate Settings upon exit”
- Click OK to save your settings and restart your computer.
The error should now be resolved. In case it isn’t do let us know and we’d be glad to help you out.

Very informative. Learned many new things 🙂